Hello! This is Chris with Quality Sewing, and I’d like to show you how I made these adorable little plush ghosts with the Brother Dream Machine:
I confess I’m actually not much of a sewist; I work behind the scenes of Quality Sewing in advertising. But the Dream Machine is so unbelievably easy to use that even I could do this--so it should be no problem for you!
First off, draw a ghost. Just a simple face and a ghostly outline. Here, look how cute he is!
You can make it pretty much any shape and size that you want as long as it’ll fit on your fabric in a hoop. I used those sheets of felt that you can buy at a craft store for like 35 to 40 cents each. Those are about 8” x 10”, and I used the 5” x 7” hoop to hold them. So I drew a ghost that was about 4” x 6.” We’re going to turn the ghost inside out and stuff it, so try to leave a gap of about 1” to 2” in the outline.
Put your drawing on the Dream Machine’s scanning attachment and press “My Design Center” then “Illustration” then “Scan.” The machine will take just a minute to scan in your drawing.
Then it’ll appear on the screen. We’re going to embroidery just the face first, so use the stylus to select just the face portion.
Hoop up your fabric with some stabilizer (I used Floriani tearaway medium stabilizer behind my felt) and put it in the machine. Make sure your Dream Machine is loaded up with the color of thread you want (black in this case), and embroider that cute li’l face.
Once that’s done, take off the top frame of your hoop, lay another piece of fabric on top of the ghost’s face, and re-hoop it all together. Try to get it to be as close to where it originally was hooped as possible.
Put your ghost drawing through the scanner again, but this time select “Line” instead of “Illustration” before you scan it. The scanner will convert everything to outlines.
We don’t want to embroider the face this time, so what I did was choose the eraser tool and just rub out those face lines.
One of the reason I like using felt for these is because it’s ever-so-slightly translucent, and you can put that to good use. When you get to the embroidery phase, click this button to have the Dream Machine really quickly scan the hooped material, and voila! You can faintly see where your ghost’s face was embroidered. Drag the outline so that it is positioned around the face where you want it.
Then just stitch it out! You’d probably want to switch to white thread for the outline, but I used black so it would actually show up in the photos.
Now take everything out of the hoop, tear off the stabilizer, and carefully cut all the way around your ghost. I tried to keep it about 1/8 away from the seam.
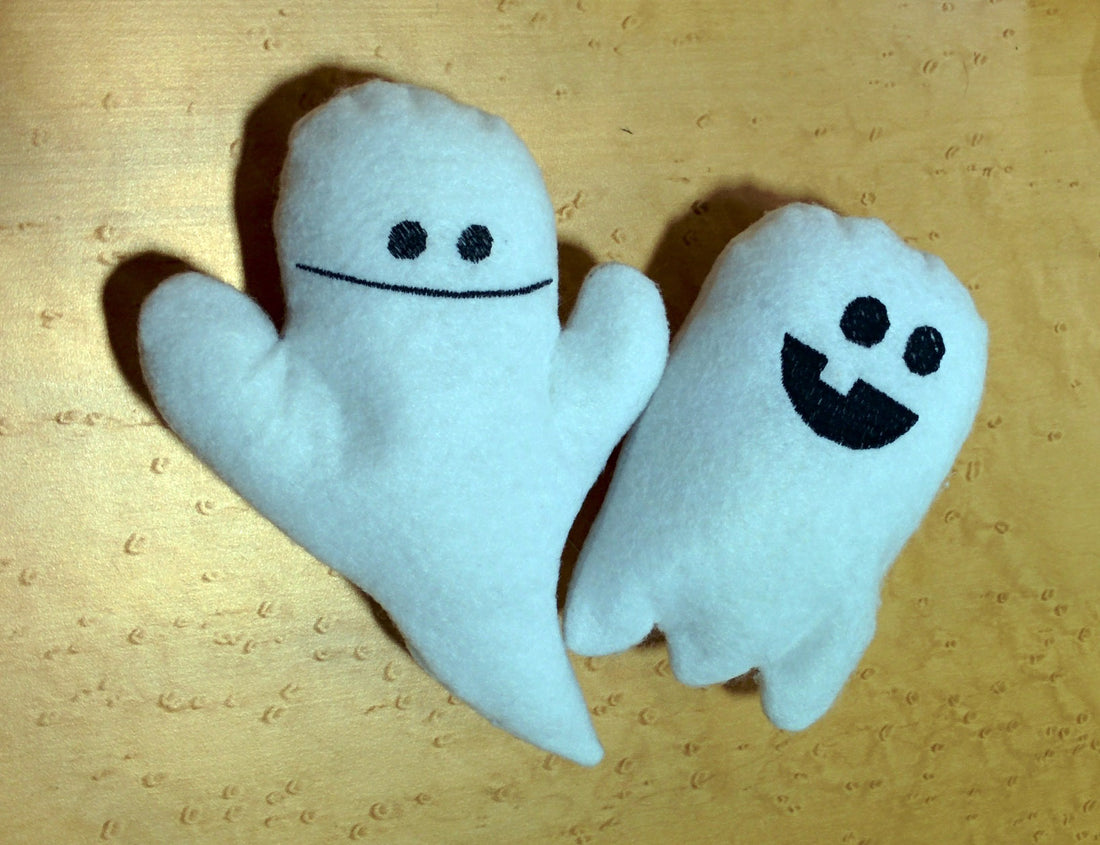
Now turn him inside out and look at just how cute he is!
Now you just have to stuff him and stitch the opening closed and there you go! You have a cute little ghost plush.
This seriously only takes a few minutes to make. They’d be so cute to give away at a Halloween party (or even to Trick-or-Treaters).
If ghosts aren’t your thing, you can easily use the same technique to make Jack-o-lanterns! Here’s one I made, the only difference is that I used orange felt and I sandwiched a loop of green felt between the two layers of orange fabric before I stitched the outline.
If you don’t think your drawing skills are the greatest and you’re worried about how your plushes will look, below are some image .JPG files that you can download and put on a memory stick. That would make the creation of these plushes even faster because you wouldn’t have to physically scan the drawing each time; just put the memory stick in the Dream Machine and pull the design up instantly!
Just click on these images to download them to your computer (if that doesn’t work try right-clicking on them and selecting “Save As”).
I hope these li’l guys make your Halloween happier.
Cheers!
-Chris