


ScanNCut Canvas is free cloud-based software to let you create, prepare, add-on, remove, save, etc. a design for your ScanNCut. You can also create rhinestone designs and make stickers and stamps. The software is automatically updated so you do not have to do anything for the newest releases. The formats that can be used in ScanNCut Canvas are SVG, JPG, PNG, FCM and DXF.
If you have not used ScanNCut Canvas before, create your free account. If you are unsure how to do this, watch this video from Brother:
Create an account at scanncutcanvas.brother.com, then log in. Once the software opens, you will see dozens of Canvas Projects from holiday decorations and gift giving to creating cards and decorative fabric projects. The possibilities are endless.
Let's do a quick project to understand how ScanNCut Canvas works.
1. Left click on the very first box that says NEW to open the main screen. You will see an image of a mat, tools at the top of the screen and patterns on the left.
2. We will start with ScanNCut Canvas built in patterns. On the left side, click Basic to display 140 different shapes.
3. Select the shape in the 3rd row, 4th column: It will be automatically placed onto the image of the mat.
4. The lower left corner shows the size of the shape. Height: 2.76” and Width: 3.94”.
5. While the shape is highlighted let’s resize to 3.5” x 4.5”. Left click Properties in the toolbar above the image of the mat.
6. In Properties we will change the size of the shape. Uncheck Maintain Aspect Ratio so the software knows we want a special size.
7. Enter 3.5 in the first field and 4.5 in the second field. Press Enter on your keyboard or left click somewhere in the blank spaces of the Properties box to accept the changes. NOTE: If you do not press Enter or left click somewhere in the Properties box before you do Step 8, the last entered size will not be accepted and will return to its original number.
8. We also want this to be a Cutting Line only. In Line Type left click Cutting Line to select. Close the screen by left clicking on the X in the top right corner of the window.
9. Basic Patterns is still open. Left click to choose the Circle in the 9th row, 5th column. The software places everything in the top left corner, so the circle is layered over the top of the rectangle we have already created.
10. When you hover your mouse over the circle, you will see a move tool, a 4-way arrow, which is the standard cursor for Move in software. It is not necessary to move the circle of this project as we will place it later, but if you are not familiar with this tool, while the move cursor is hovered over the circle, left click and drag the circle to the right side of the rectangle.
11. Select Properties. We want this to cut a hole in our gift tag so left click on Cutting Line.
12. Left click to place check mark in Maintain Aspect Ratio.
13. Enter .50 in either Size field so the hole is large enough for a ribbon. Close Properties. NOTE: In Step 7 we had to press Enter or left click in Properties to accept the change in size. For this change, we selected the Line Type first, then changed the size. When the size is changed last, closing Properties will accept the size you entered.
14. It looks like there is no hole just a blue blob. The software has been changed so the handles are larger. For smaller items like our circle it looks like it isn’t even there. Rest assured it is. Click away from the circle to deselect. The circle is now visible.
15. With the circle deselected (shown in red below for clarity), hover the mouse over the circle and you will see the Move tool. Left click and hold the mouse key down.
16. Drag the circle to the left until the left edge of the blue dots touch the edge of the rectangle. This will put the circle about ½" away from the edge of the gift tag. Don’t worry about centering top to bottom, we will let the software take care of that.
17. Left click, hold the mouse key down and drag a box around both shapes to select, or click the Edit tab at the top of the screen, and choose Select All
18. With both selected choose the Edit tab and click Middle to center the circle on the gift card edge.
19. Right click in the work area and choose Group . Group can also be selected from the Edit tab.
20. In Pattern, left click Return to view all of the pattern categories.
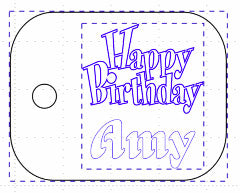
21. Select the category Logo. Scroll down and choose Happy Birthday.
22. We have already learned how to size a shape in Properties. Do you remember how we did that? Use the same instructions to size the logo to Height 1.85 and Width 2.50. While Properties is still open, choose Drawing Line.
23. In Color click the dropdown arrow for Line and choose a blue. Changing the colors will let you see which is a cutting line and which is a drawing line. Close X Properties.
24. Move this towards the top right of the gift card, position to your liking, leaving room for a name under the logo. Click the Edit tab and choose Select All or left click and drag a box around the entire design. While all of the elements are selected, left click and drag the gift tag away from the upper left corner so our new entry will not be over our gift tag.
25. Left click Return to view all of the pattern categories, then select Text.
26. Left click on a font of your choice. The software will automatically place the word “text” in the upper left corner of the mat. The text I chose for this instruction is FO-W010:Hungary which is in the 8th row, 1st column .
27. Double left click at either end of the word “text”, hold down the left mouse key and drag to highlight the entire word.
28. Type in a name. In Properties select Drawing Line. In Color click the dropdown arrow for Line and choose the same blue you used in Step 23. Changing the colors will let you see which is a cutting line and which is a drawing line. Close Properties.
29. Using the corner handles to size, reduce the size of the text to fit under Happy Birthday. Left click and move the name so it is under Happy Birthday. Resize more if necessary.
30. Once you like the placement let’s make sure the words are centered. Left click on the gift tag only and move the gift tag out of the way so the words are by themselves.
31. Left click, hold the mouse key down, and drag a box around the words only to select them.
32. Choose the Edit tab and click Center . Right click and select Group.
33. Move the gift tag back over the words and position to your liking. Select the Edit tab and choose Select All. Choose the Edit tab again and click Middle to evenly position the words from the top and bottom of the gift tag.
34. While the entire gift tag is highlighted, right click and choose Group so it is grouped when you transfer it to your ScanNCut.
35. To save, click in Project Title in the upper left corner. Type in a name for your project.
36. Left click on Download and the Send Data screen appears.
37. There are two options for saving:
- Download to a PC
- Save it to your computer
- Save it to a USB drive that has been placed in one of the USB ports on your computer.
After you save the design to a USB drive, insert the USB into the USB port of the ScanNCut to retrieve the file.
-
ScanNCut Transfer
NOTE: The CM650W is wireless network ready and comes with the ScanNCut Online Activation Card. The CM350 is also wireless network ready but it does not come with the ScanNCut Online Activation Card, which is an additional purchase.
- Turn on your ScanNCut
- From Send Data in Canvas, click ScanNCut Transfer.
- The transfer is ready.
- At your ScanNCut
- Touch Pattern.
- Touch Import Data.
- The Gift Card is now in the work area of your ScanNCut
37. Choose the transfer style for your ScanNCut. ScanNCut 1 only uses the USB transfer. ScanNCut 2 can use USB or Wireless transfer.
Additional Information for ScanNCut Canvas
38. If you want the words colored in, choose the word or words you want colored before you group the entire gift tag. Select Preferences. Click Fill the area in the outline with the drawing function. It won’t look any different in ScanNCut Canvas, but it will on the screen of your ScanNCut. Don’t forget to Group before you transfer it to your ScanNCut.
39. The ScanNCut example of the gift tag below shows the words with and without fill.
40. Add a ribbon and attach to your gift!
Enjoy your creative adventures!!
~Lana L. Jones

