


This application is used to create cutting data for character patterns from TrueType fonts installed on your computer.
Have you been wanting to cut letters from the True Type fonts in your computer, but found it difficult to get it right? Brother has a FREE download to do just that!!
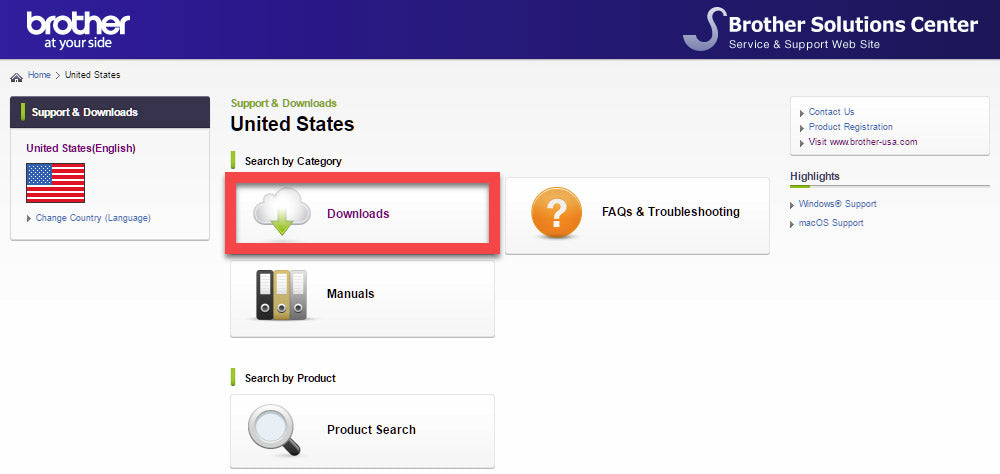
- Go to support.brother.com and click on Downloads.
- From Search by Product Category, choose ScanNCut (Craft and Cutting).
- Click on CM Series.
- Select your ScanNCut.
- Select your Operating System (OS). At the bottom, under What’s New, left click on the proper operating system to download.
- The next screen identifies the software you are about to download. Click on ScanNCut Type Converter.
- Read the information, and click on Agree to the EULA and Download. This will start the download and will place a zipped file to your Download folder.
- How to Install will appear. This will walk you through how to open and use the new Brother ScanNCut Type Converter. Print this out for reference.
- Go to Downloads on your computer. Right click and cut or copy the file labeled snctx_v100_ Paste the zipped file to folder that you can easily locate.
- Using an Unzip program, such as WinZip, extract the file.
- You will see the program icon appear just above the zipped file. You can either access the program from this folder, or you can right click and select Pin to Task Bar for easy access. NOTE: The task bar is the bar at the bottom of your computer screen.
- Double left click on Brother ScanNCut Type Converter to open the software onto your screen.
- In Settings, the font list is generated from the True Type Fonts in your computer. Select a Font, Font Style and Size. At the bottom is Character Spacing in Inches.
- At the top of the screen enter the letters you want to cut out with your ScanNCut.
- Click Preview to see if you like the results of that particular font.
- In the sample below I chose to do my name with a font that I have purchased. I have selected Normal style and size of 72. Looks great! Now I can close the Preview and save it to my computer. Save this in a file that you can find when you get to ScanNCut Canvas. :)
- The software will give it a name, but you can change this to something more recognizable. I will leave the name the software chose and save it to ScanNCut FCM Files, a file that I created for this instruction. Notice I have already saved one file so the software automatically gave it the next number.
- Open scanncutcanvas.brother.com
- Select the Import SVG/DXF/FCM.
- Click Choose File.
- Select the file where you saved your lettering, then click OK.
- Your lettering appears on your mat and is ready to cut out or adjust as needed.
Enjoy your ScanNCut Adventures!
Lana L Jones
Educational Consultant


